Sunday, May 27, 2012

UHA: Reusing socks


The Universal Household Assistant promises to tell you "what every person should know." What is so interesting is that the book was published in 1884. Some of the information is good, some very outdated and some quite laughable by today's standards. Every Sunday I will bring you an interesting tidbit that I find in my book. Enjoy!

Skirt for a child: A good way to utilize ribbed socks when the feet are past wearing, is to cut the legs off straight above the heel. Open up the back, sew or crochet enough of them together to give width for a child's skirt, making shell trimming for the bottom, and sewing in a bank at the waist. These are warm, durable, pretty and little trouble to make.

If I were a handy sewer, I would have to try this!

Saturday, May 26, 2012

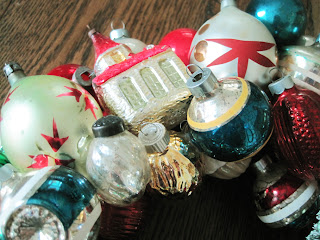
Christmas Wreath

I don't really have a tutorial this time, just a couple pictures of a project that I have wanted to make for a long time. I have collected ornaments for a long time to make this wreath and last week I finally sat down make put it all together. To help with filling in the cracks, I covered the wreath with that red, velvet ribbon that you can get copious amounts of at Christmas.


I used some new, but mostly used ornaments. The best advice I have for you is use a lot of hot glue and keep the wreath laying flat. If you move it too much, it won't lay flat on the wall when you hang it. I have had to go back and re-glue some of the small filler ornaments. Good luck!


Thursday, May 24, 2012

Trivet Pin Board

Pinterest has everyone pin-happy, but I still like to actually use a physical pin board for bits and scraps and ideas. While I was at Ikea a few weeks back I bought several packs of cork trivets to make my own cork pin boards. It was an easy afternoon activity to put together several groupings.


Your basic materials are cork mats or trivets, metal mending plates, screws, screw driver, and a small d-ring hanger. You can get a lot fancier with paint and ribbon but this is the original simple idea. 


Place the cork pieces in the position you want them to be in, use the mending plates and screws to connect them together. 


Attach the d-ring hanger at the top of the board, and hang it where you want to use it. I used a little hot glue to hold the screw in place for the hanger, it also keeps the screw from scratching the wall. I also used trivets because at Ikea they are pretty thick and inexpensive. Sometimes cork at a regular department store can get expensive.


This is where I hung one of the boards I made. It hangs on the corner of my corner cabinet, no irony intended!


Tuesday, May 22, 2012

Patchwork Shoes


I know it seems I fell off the face of the earth, but I have been a busy girl. My daughter, M, finished preschool last week and since then I have had to be sole entertainment. But enough with excuses. I was searching around Pinterest one day when I happened upon this idea. My mom quilts and a while back she gave me a huge box of scraps, and I just knew this was the perfect idea to use some of them. It took me a while to find inexpensive shoes to use, now that Toms are so hot, all the skippies are more expensive than usual. Skippies is what we used to call no-name shoes when I was in high school 100 years ago.


What you need is a bunch of coordinating scraps, fabric fusion glue, a pair of shoes. scissors and a paint brush. It should be a cheap paint brush because you will probably have to throw it away afterwards. Now the blog I read mentioned thinning the glue with water to make it go farther, but I found that I had a hard time getting the fabric to stick when I did that so I used it at original strength. I also found that it worked best when I put glue on the shoe, on the back of the fabric and over the top of the fabric. That helped hold the fabric in place.


Basically you cut scraps to fit the edge of the shoes and glue away! It takes a little bit of time to get the fabric to lay where you want and to cut it to fit. My main problem with this project has been after the glue dried. The shoes are incredibly stiff. I have washed them but I think I will need to wash them again to help with that problem. Also next time I will use only two or three fabrics to make a more cohesive design. 

Saturday, May 12, 2012

Spinach manicotti


I think that this dish is considered to be a difficult dish, however this recipe certainly makes it simple. It is also a nice change when you want something without meat.

You will need: 7-8 manicotti shells | non-stick spray | 1 15oz container ricotta cheese
1 cup grated Parmesan | 1 10 oz package spinach, thawed and squeezed dry
2 cups prepared marinara sauce | 2 tbsp cream (I used half and half)

Preheat oven to 375 degrees. Boil the pasta for 7-8 minutes, drain and place in an 8-inch square baking pan that has been sprayed with non-stick cooking spray. In a medium bowl, mix the spinach, ricotta, 1/2 cup of Parmesan, s&p. Transfer to a plastic bag, squeeze bag and cut off corner. Squeeze filling into the shells, filling halfway from one side and then switching to the other side. Place back into baking dish.

In a separate bowl, mix the cream and marinara sauce. Pour over the top of the filled manicotti.  Sprinkle the rest of the Parmesan over the top. Bake for 30 minutes.


Friday, May 11, 2012

Tomato jam

This past weekend I spent some time in Atlanta and ate at a local Italian place. For lunch my friend and I had some pretty unique sandwiches. I had a pimento cheese and bacon jam panini and she had a meatloaf panini with tomato jam. Both were fantastic so I want to recreate them both at home. I am still working on the bacon jam but I did make a batch of tomato jam and I want to share it with you.


You need 5lb of tomatoes, chopped. These are some tomatoes I froze from last summer, aren't they gorgeous? They worked fine, but I did drain them as they thawed.


The rest of the cast of characters: 3 1/2 cups sugar | 8tbsp lime juice | 2 tsp freshly grated ginger
1tsp cinnamon | 1/2 tsp ground cloves | 1tbsp salt | 1 tbsp red pepper flakes

Combine all ingredients in a large pot. Bring to a boil, then reduce and simmer. Stir regularly and cook until it reduces to a jam-like consistency. This takes about 2 hours. 


When the jam has cooked down enough, fill sanitized jars, leaving 1/4 inch of head space. Wipe rims, apply lids and twist on rings. Process in a boiling bath for 20 minutes. When time is up, removes jars from water bath and cool. Be sure to test your seals. Store in a cool, dark place for up to a year.

Monday, May 7, 2012

Chicken pomodoro

It sounds so fancy but couldn't be any easier or tastier. No need to order this at a restaurant any more!


You will need: 1lb boneless, skinless chicken (I use 5-6 tenders) | 3tbsp olive oil | 1 onion chopped fine
4 garlic cloves, minced | 1 14.5 oz can of Italian diced tomatoes | 1/3 cup heavy cream

Pat chicken dry and season with s&p. Heat 1tbsp olive oil in a large skillet over medium-high heat. Cook chicken until done, transfer to a plate.

Heat remaining oil in the pan. Cook onion until softened, about 5 minutes. Add garlic and cook about 30 seconds. Stir in tomatoes, cream and 1/4 tsp salt and bring to a boil. Add chicken back to the pan (I usually go ahead and cut the chicken into bite size pieces before adding back to the pan). Simmer about 10-15 minutes minutes or until the sauce has thickened.

Serve over rice or pasta.


Sunday, May 6, 2012

UHA - preserving wings of birds


The Universal Household Assistant promises to tell you "what every person should know." What is so interesting is that the book was published in 1884. Some of the information is good, some very outdated and some quite laughable by today's standards. Every Sunday I will bring you an interesting tidbit that I find in my book. Enjoy!


Place them as you wish and dry them slowly before the fire. We cure turkeys' wings by spreading them on the hearth and placing a smoothing iron on them to hold them in place until the moisture and oil be dried out; sometimes it takes several days.

Thursday, May 3, 2012

Perfect potpie

I like chicken pot pie. I like the pie crust on the top and bottom, I like the kind that only has a top crust. I have found a recipe that makes a very delicious top crust that uses very common ingredients and cooks up even and pretty.


Filling: Mix together 2 cups of your frozen veggies | 1 1/2 - 2 cups cooked chicken | 1/2 cup milk
1/2 tsp garlic powder | 1 can cream of celery | 1 can cream of chicken or mushroom

Spread into a greased 13x9 pan.

Crust: 1/2 cup butter, melted | 1 cup all purpose flour | 1 cup milk | 1/4 tsp pepper | 1/2 tsp salt
2 tsp baking powder

Mix all ingredients together, it will be a little lumpy. Spread evenly over the veggie mixture. Bake at 400 degrees until golden, about 30-35 minutes.

Tuesday, May 1, 2012

Powder detergent

Not to get all granola-y on you but I was checking some blogs about making things from scratch and came across several folks who make their own detergent. Some people make their own liquid detergent and I read about that, but the effort outweighed the benefit to me. I also read a few "recipes" about powdered detergent and thought it may be worth trying.


All you need is 1 cup super washing soda | 1 cup Borax | 1 cup grated soap (I used Fels Naptha).

All the recipes that I found had twice as much soap as soda or Borax, but I felt that was too much so I adjusted and it works just as well. You toss about 2tbsp in with your wash and it gets clean and smells good. If you want to check out the blog I got my information from, she talks about what the different ingredients do for your laundry. She also has lots of other recipes for making things from scratch in your home.  FYI: 1 bar of soap = 2 cups grated.

http://heart-hands-home.blogspot.com/